Recent Canon cameras1 allow for direct uploads from the camera to different Internet services. Some of them are mediated through the image.canon gateway (i.e. Flickr, Adobe, Google), the camera uploads images to the gateway that in turn transfers them to the end service. Since those services APIs can change over time, it’s not a bad decision, even if you have to rely on a third party service.
Cameras support also the FTP(S) and SFTP protocols. These are well defined standard protocols, supported by many different systems, don’t rely on a product specific API, and don’t require a third party gateway,
Just setup your own FTP or SFTP server, configure access to it from the Internet, and whenever you camera is connected, you can upload images directly to your server. In this article, we will focus on FTP. In some configurations it could be a little less secure than SFTP, but on the other hand FTP users can only transfer files, while SFTP users are SSH users also, and SSH is a protocol designed to access a shell on a remote system.
FTP is one of the oldest Internet protocols still in use, and was designed for a bygone era, when NAT, firewalls and encryption were not needed. So it’s a little more complex to make it work across NAT and firewalls, and today you should use its TLS implementation to protect the connection, but maybe for anonymous, read-only access to public resources.
NAT configuration
Let’s tackle NAT first. FTP is different from protocols like HTTP because it uses more than one connections to work. There is the control channel established on a known port (usually 21 for FTP, and 990 for implicit FTPS), and then the data channel established on an ephemeral port dynamically selected and communicated through the control channel. Thereby, it’s not sufficient to forward/open a single port on the NAT/firewall system.
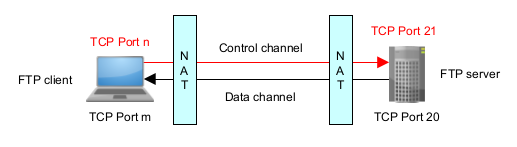
Moreover, FTP can work in two modes. In the active one, the client (i.e. the camera) tells the server its IP and TCP port the server should open a connection to for data transfers, from the server own TCP port 20 (989 for implicit FTPS). Yes, active means that the server connects to the client to transfer data, not viceversa, even for uploads. This means of course that you’ll have to forward and open ports on the client side NAT/firewall as well, and when you can’t control that system, this is not possible.
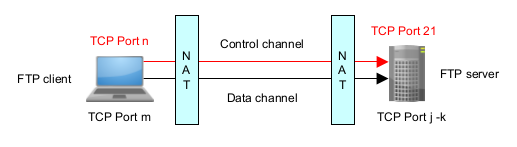
In passive mode the connections are initiated always by the client, both the control one and the data one. Still, the server will tell the client on which IP address and TCP port the client should connect for the data channel. This port is selected within a range configured on the FTP server. Thereby only the server side NAT needs to forward the control port (21, if you didn’t change it), and the data channel port range. FTP uses TCP only so just configure the TCP protocol. Because TCP may take some time before a port can be reused, this range should not be be too small, even when only few users need to transfer data at the same time.
Passive is the recommended mode to configure a server to let system communicate across NATs. If firewalls are involved also (and I hope they are), the server side firewall has to allow incoming connections to the control port and the data ports. It’s advisable to restrict that access only to the destination FTP server(s). On the client side, the firewall needs to allow outgoing connections to the server IP, and the control/data ports. Otherwise FTP won’t work. A VPN could be used to bypass such restrictions, but cameras as I write don’t support VPN connections directly, so it would need to rely on an outside system that acts as a proxy – a topic for another article.
Since the ports are dynamically selected, and notified inside the protocol, avoid mapping different ports on the external side from those on the internal side. Unless there is something (see ALG later) that can change them on the fly, FTP transfers won’t work if they are different. Map the same ports.
There’s also a final issue. FTP transmits the public IP the server has to be contacted to inside the FTP protocol itself. By default, this is the IP assigned to the FTP server. When the FTP server has a private IP, as it is usual when it is behind NAT, it will transmit its private IP, and the client cannot use it to connect. Some clients may be clever enough to use the IP they see in the IP packets instead, but that’s not a standard, so you can’t rely on it, and I don’t believe Canon implementation supports it.
Usually, in the passive configuration settings there is a way to set the external (or public) IP. Which is fine if you have a static one. When it is dynamic, or the FTP server has a way to reconfigure itself when the IP changes, or it will stop working until the IP is reset. Check your FTP server documentation about it.
There is another way, in routers that has proper support for it, and is the use of an Application Layer Gateway (ALG). ALG can inspect a protocol traffic, identify specific data inside it – like IPs and ports – and modify them on the fly as needed. Since the router knows its public IP, it can modify it automatically. ALGs can also forward ports as needed, without explicitly doing it. Because they modify the traffic, they can also break it, if not properly written. And usually don’t work with encrypted traffic (unless they can work as re-encrypting proxies). Start testing without an ALG enabled, and then if you wish remove manual forwarding, and test with the ALG enabled.
When the public IP is dynamic, you’ll need also a way to reach your server whatever the IP is in that moment – thereby you’ll need to use a Dynamic DNS (DDNS) service. Today many routers and NAS offer such a service.
Note that you need a public IP. If your ISP assigns you a Carrier Grade NAT (CG-NAT) IP (in the 100.64.0.0/10 subnet, or one of the private ones 10.0.0.0/8, 172.16.0.0/12, or 192.168.0.0/16), you won’t be able to publish an FTP server. That is also true if your ISP uses one of the IPv6/IPv4 transition technologies, like MAP-T or MAP-E, that assign your router only a subset of the TCP/UDP port ranges. You might still make it work setting all the ports within your assigned range, as long as they can be configured and accessed by the client system.
Cascading routers
If you use more than one consumer routers, one connected to the other, probably you have multiple NAT as well. In such a configuration, you will need to perform forwarding and firewall settings on each on them. You can also set the “internal” router as the “DMZ” IP of the “external” one (DMZ2 is a little misleading term in consumer routers, the correct defintion is default host), so all incoming connections without an exiting NAT mapping, or explicit forward rules, are sent to this IP. The “internal” route shall protect now its LAN from not allowed traffic. The external FTP IP is still the public IP assigned to the “external” router. Note that the “external” router sees the FTP server traffic with the “internal” router IP on its LAN.
Another solution, the one I usually prefer, is to disable NAT on the internal router(s) – if possible, of course – and then just configure routing among them. Just use the external router IP as the default gateway for the default route of the internal router, and on the external router set a route in its routing table for the internal router subnet(s), having the IP of the internal router on the external router LAN as its gateway. Port forwarding needs then to be configured only on the router performing NAT, while firewall can be configured on each router as desired.
Using two routers, if both have a decent firewall also, you could actually create a true DMZ to host your FTP upload server , for increased security. In this configuration the FTP server is not positioned inside the internal router LAN (the backend one), it is in the external router LAN (the frontend one). For external access, the configuration is the same as before. If compromised, the FTP server still have to bypass the backend router/firewall to gain access to the LAN. Once uploaded, the files can be moved to their final destination in the LAN.
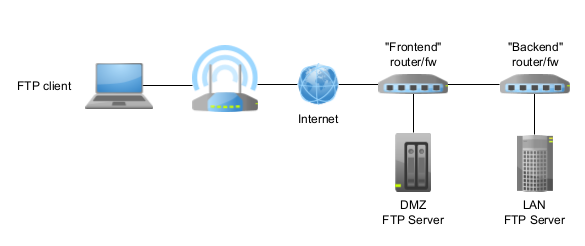
You may choose also different protocols to transfer files from the DMZ FTP server to their final destination (SFTP, SCP, HTTP, SMB, ecc.), and you can use the backend firewall to control those access, for example the DMZ FTP server may accept HTTP connections only from LAN IPs.
IPv6
IPv6 would solve all the NAT issues, but the firewall(s) should still need to allow the FTP traffic on the control channel port and the data ones. But as far as I know Canon cameras don’t support IPv6 yet, as I write.
Encryption
Plain FTP transfers everything in clear text, including your password. Thereby today is too risky even in a small LAN3. FTP can use TLS to encrypt data, but require additional configurations, and especially, a valid certificate/key pair.
If you have your own Internet domain, you can use services like Let’s Encrypt to generate free certificates. Some FTP server may support it directly, and manage renewal automatically, otherwise you can use a combination of utility and scripts to perform that – that can be quite server specific. Of course you can use any other service selling certificates.
Without owning a domain, you can generate your own CA and then certificates for it (or a self-signed certificate, but this are now mostly frowned upon). How to do that is outside the scope of this article (read How to manager your own PKI with XCA for a way to do that)
Canon cameras may check only the common name field of the certificate, while today most systems check for the subject alternative names instead. Ensure you have the hostname you wish to connect to in both of them.
I do not know what certificate parameters Canon cameras accept – I guess fairly standard RSA certficates with a 2048 bits key should work. I won’t try to create more “exotic” certificates, unless you have very high security needs.
Once the FTP server is configured with a certificate/key pair, you’ll need to configure FTPS itself. There are, again, two available modes: implicit and explicit, much alike the same modes in IMAP4 and POP3 protocols for emails.
The implicit mode expects the client to start talking TLS from the very start of the connection, without asking for it explicitly (hence the implicit name). Implicit protocols usually use a different standard port from the plain text protocol. For FTPS, that’s 990 for the control channel port. The data ports are taken form the same range. You can always change the control port, as long as the client is then set to use the same port. This port needs to be forwarded through NAT and open in the firewall.
The explicit mode starts as a plain text connection, on the same unencrypted connection port (21, if not changed), and then the client asks for a TLS connection explicitly. If the client and server can agree on the encryption parameters, the connection is switched to TLS.
Select the TLS version(s) supported. At the time of this articile is written, you should select TLS 1.2 or better. But older devices may not support newer protocol versions and you may be forced to allow TLS 1.0 or TLS 1.1 also, if possibile. Remember that decreases security, thereby plan additional hardening accordingly. Don’t enable SSL 2 o 3, even if still supported, they are really too old and vulnerable.
Once the connection is encrypted, most ALGs and firewall helpers cannot snoop the traffic to identify IP and ports – so everything must be forwarded/opened manually. Some firewalls can perform deep inspection of TLS control channels, but probably consumer routers can’t4.
Configure the FTP file system for uploads
It is better to avoid to give access to the whole destination server file system through FTP. Remember, when you publish a service you are increasing the attack surface of your network. You have to ensure only the required access is available, and with the appropriate, most restrictive privileges needed only.
Thereby, do not use a user with admin privileges for the uploads. Create a specific non-admin user for such a task. Create a directory for uploads in the file system, and set it as the root FTP directory for that user. Assign write permission only on this directory.
You may also wish to use other settings like quotas to avoid uploads filling up the whole disk, or limit the maximun usable bandwidth to avoid disrupting other services.
Setting up the camera
My advice is to test the FTP server and NAT/firewall settings using an FTP client from a PC to check everything is working fine. Usually, you’ll receive far more informative errors and logs when something isn’t working. Once it works, it’s time to configure the camera.
The camera needs to be configured already with a working network connection – wired of WiFi. See, for example, the R3 instructions. Other cameras, and even WFT adapters, should not be much different.
Then enter the FTP settings, and select the FTP mode between FTP and FTPS. SFTP is a different protocol, remember, and won’t work with a FTP server. Set the FTP server address. If you use FTPS, enter the host fully qualified name used in the certificate. If you use the IP, the certificate validation won’t work, unless the IP too is in the certificate, but no public CA will issue you a certificate with IPs unless you prove you’re the rightful owner (assigned to you by an Internet RIR5, not by your ISP).
Set the control channel port published by your FTP server, then enable the passive mode. Unless there’s a proxy in the network the camera is connected to, there no need to configure one, so disable it.
You didn’t want your FTP server to accept anonymous uploads (and didn’t configure it that way), so set the login credentials. Select the folder you want to upload your images to, you may wish to select a folder under the root one, and it can be created automatically if needed.
Press OK. You may get a message that the security or the server cannot be verified – that may happen if the camera doesn’t have the CA certificate to validate it, it is still useful to accept connections using self-signed certificates.
If you are sure everything is correct, press OK. If evertyhing works, you’ll be notified you are connected and settings are being saved.
You can load the CA certificate copying it to a card, and the load it into the camera. It has to be named ROOT.CER, ROOT.CRT, or ROOT.PEM. Select from the camera menu Network Settings > Connection Option Settings > FTP Transfer Settings > Set Root Certif. From Card. Select OK, and the certificate is loaded. Now the camera should be able to verify the server certificate.
If it doesn’t work, and the error reported from the camera is not enough informative to understand what is wrong, start from the FTP server logs, and check it the camera attempts to connect but fails, you should find the reason here. If there is nothing, check the NAT/firewall logs and settings.
- Canon WFT transmitters for older camera allows for FTP transfers too. ↩︎
- A true DMZ is one or more IP subnets between two firewalls, a frontend one controlling access from/to the internet, and a backend one controlling access from/to the LAN. The idea is a compromised system in the DMZ still has not full access to the LAN. ↩︎
- The only situation I might allow this is a direct connection between the camera and a PC – i.e a direct cable or WiFi Direct. Just remember to avoid having an active FTP server configured this way when you connect it to a network. ↩︎
- FTP servers may support the CCC command that lets un-encrypt the control channel after authentication, so that a firewall/proxy inspecting it can still work, but the client has to send it. ↩︎
- A Regional Internet Registry is the entity tasked with managing IP addresses assignments, among other Internet resources ↩︎