Protecting connections with TLS requires the proper certificate/private key pairs, that need to be issued by a trusted Certificate Authority. You can buy certificates form several public CAs, or obtain free ones form entities like Let’s Encrypt.
Sometimes you may need your own private CA and certificates for systems that do not need to be public, that may use internal domains and IPs for which you can’t obtain a public certificate.
Windows Server has a CA service you can use, and there are applications like SmallStep step-ca that allows to create and run an online CA. If you don’t need an online CA, you can use OpenSSL from the command line to create and manage everything required, but it’s very little user-friendly.
Here I’ll suggest a tool that wraps OpenSSL, lets you easily create and manage certificates and keys using a comfortable, and can also store them in a local SQLite database, or even a remote one using MySQL, Postgres and ODBC drivers. Everything protected by a master password. This tool is XCA. It supports Windows, macOS and Linux.
Create the database
After installing it, open it and select File > New database for a local, SQLite database. The XCA Options dialog for the database is shown. Some options should be changed from the default ones.
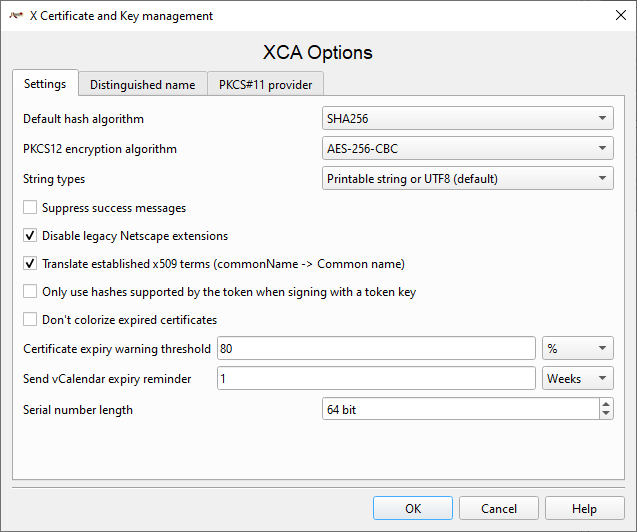
Set:
- PKCS12 encryption algorithm to AES-256-CBC
- Disable legacy Netscape extensions
- If you wish, activate Translate established x509 terms. If active, some fields use user-friendlier descriptions, instead of x.509 terminology.
Other fields can be left to defaults values.
Create a Certificate Authority.
Self-signed certificates are frowned upon today by most TLS applications, since there is no way to check for their origin. Valid certificates should be issued by a Certificate Authority (CA). You can create your own CA. Root CAs are themselves self-signed certificates, with some specific certificate extensions identifying them as CAs. They are not trusted automatically, you have to install and trust them explicitly. Your OS or browser (and even some applications) usually come with pre-installed and trusted CAs, vetted by the OS or browser manufacturer. You can add and trust your own. How to do it is system specific. So, let’s create a CA.
In the Certificates tab, press the New Certificate button. The New Certificate dialog opens:
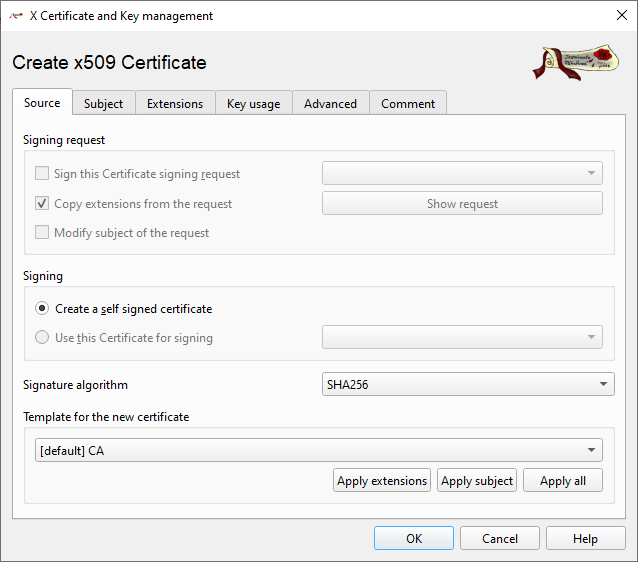
XCA comes with some pre-defined templates that ease the task of creating a certificate from scratch, especially when you are not an X.509 master. Selecting a template, and then pressing one of the “Apply” buttons will set many certificates properties automatically. “Apply extensions” will just set the extension and key usage properties, “Apply subject” will just set the certificate subject data. User can create their own templates, which may save a lot of time when generating several certificates.
For the first CA, select the [default] CA template and press “Apply all”. A root CA is a self-signed certificate. Intermediate CAs are signed by another CA, we are going to create a root one, and without any other CA available, the only option is anyway “Create a self-signed certificate”.
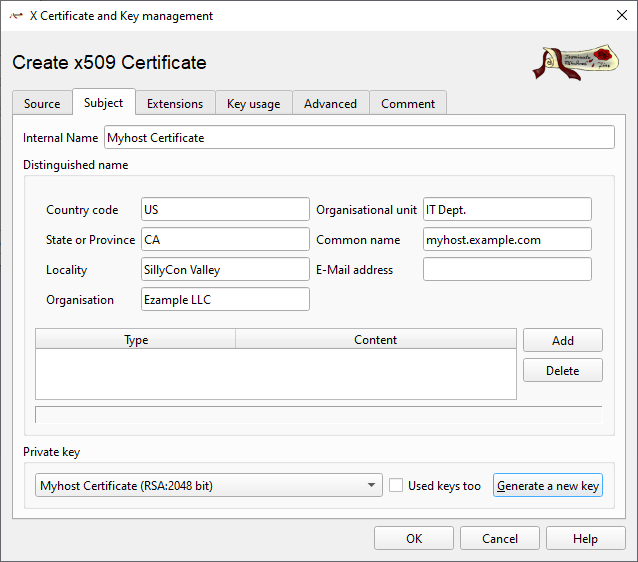
Now switch to the Subject tab. We need to insert some identifying information about the CA, especially its name, and generate its keys:

- The Internal Name is just the name used internally by XCA to identify this certificate inside its database. You can use anything you like.
- commonName/Common Name is the CA name and it is used to identify the CA. It is not mapped to any specific host or the like, so you can use any valid name here. Usually, it it is a string with the CA name and sometimes its scope, i.e. “Microsoft Timestamp Root Certificate Authority”. Once the certificate is created, you can’t change it without generating a new CA. This field is mandatory.
- Country code, State or Province, Locality, Organization, Organizational Unit and email are just informative fields. You can add some more with “Add”.
Here also the certificate private key is generated. You can re-use an existing key, if needed (i.e. you made a mistake, deleted the certificate but do not need to generate a new key), or generate a new one. Press the “Generate a new key button”, the New Key dialog opens:
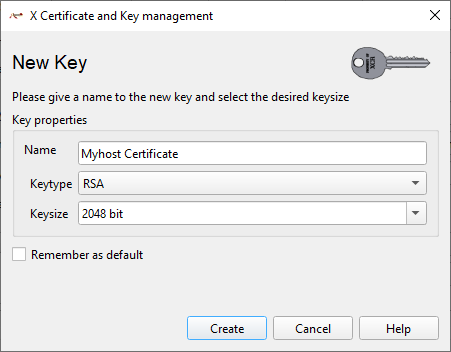
- Name is the key name as it is stored in the XCA database. I use usually a name that makes easy to identify which certificate is associated to it. It could be the same name used for the certificate internal name, or something alike.
- Keytype is the algorithm used for the key. You can choose among
RSA,DSA,EC(Elliptic Curves) andED25519. - The Keysize/Curve name field changes (or disappear) depending on the Keytype selected.
Explaining the differences among keys type is beyond the scope this article. For this example, let’s generate an RSA key, which is fairly common and well supported. Set the Keysize to at least 4096. CAs are long living certificates (usually several years), so it is important their keys are very hard to crack. The larger the key, the harder to crack it. Press “Create”, and XCA will perform the required processing to generate a key, store it in its database, and assign it to the certificate.
Once the key is generated, switch to the Extension tab:
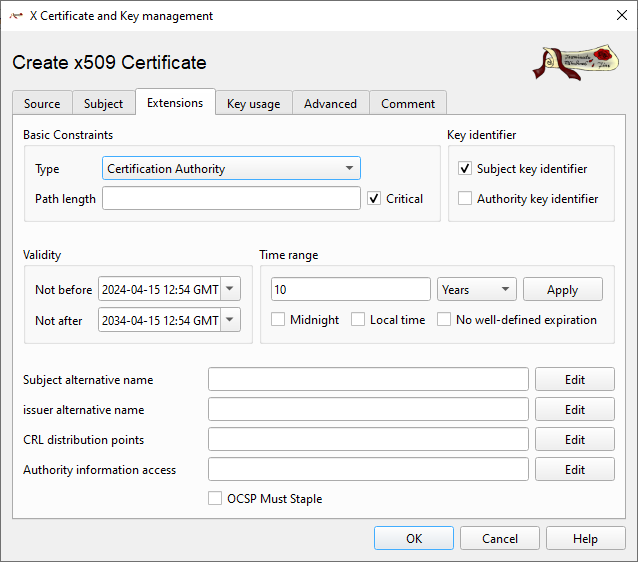
If the CA template was selected, several fields here will be already properly filled. The Type is set to “Certification Authority” and marked critical. Key Identifier is set to “Subject Key Identifier”. The Validity is set to 10 years, you can change this if you wish. Remember to press the “Apply” button, pressing OK is not enough.
A CA doesn’t require “Subject alternative names” usually, but can indicate a CRL (Certification Revocation List), a URI that tells where an application can download the CRL to verify certificates aren’t revoked, i.e. https://pki.example.com/example.crl. You can set more than one address, for example a public accessible one and an internal one.
Switch to the Key usage tab now. CAs should be used only to sign other certificates (and CRLs), they should not be used for any other task.
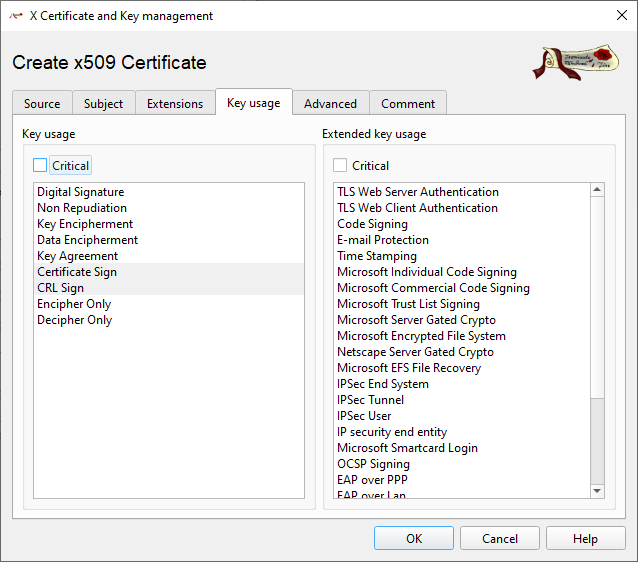
Thereby the only selected Key usage should be Certificate Sign and CRL Sign. If the CA template was applied, they should be already.
The use of the Advanced tab is outside the scope of this article. You can add comments for the certificate in the Comment tab, which are stored in the database along the certificate.
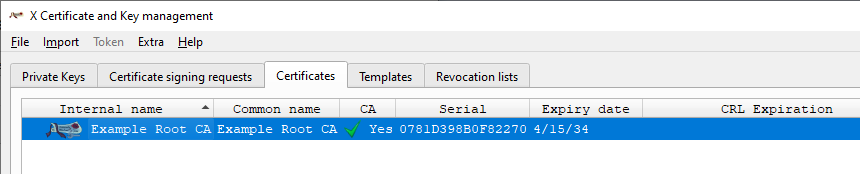
Press the OK button, the the certificate is generated and stored inside the XCA database (note the CA flag).
Generate a host certificate
Now that we have a CA, we can generate and sign end entity certificates. There are different types of these certificates. There are certificates to identify hosts in a domain, there are certificates to identify email address, certificates for code signing and timestamping. We’ll create now a host certificate – the type usually associated and used with server applications – web servers, mail servers, ftp servers and so on. The procedure is quite similar, with a few key differences.
First, select the CA that will sign the certificate and press New Certificate.
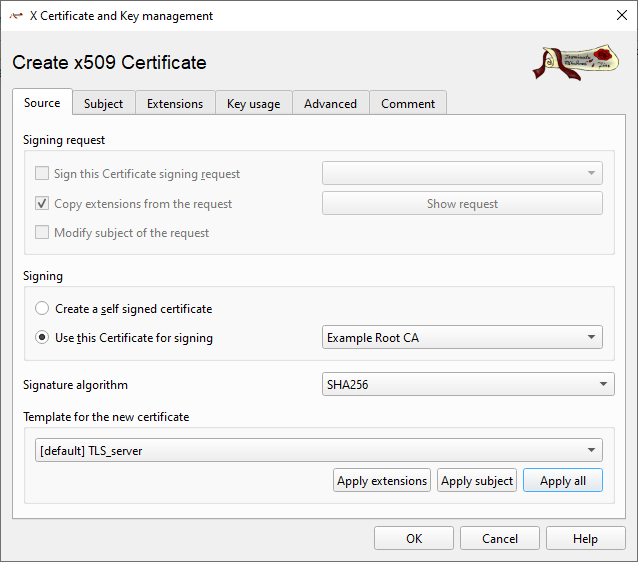
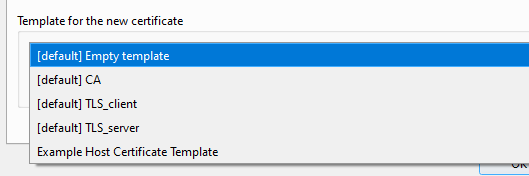
Because we had a CA selected when we pressed the New Certificate button (or selected New Certificate from the right-click menu), it is already selected in the “Use this Certificate for signing”. Don’t generate a self-signed certificate. Select the [default] TLS_server template as a starting point, and press “Apply all”. Switch to the Subject tab.
Here the Common Name field needs to have a specific syntax, it must be the fully qualified name of the host, in the form <hostname>.<domain>.<tld>, i.e. www.example.com. Of course if needed more than one domain level is allowed. If you don’t have a domain hierarchy a simple name may work too – but won’t work well when using a DNS system for name resolution. This is the name that is matched when you open a connection with a server, comparing it with the host name passed to open the connection. Actually, today the common name is no longer used, and matches often use the Subject Alternative Name field (more about it soon), but some system may use the common name still. The other fields are used just like in the CA certificate.
Generate another key for this certificate. Host certificate keys can be smaller than CA keys, because these certificates have shorter lives. Don’t use anything smaller than 2048 bits, but for very old systems that don’t support larger keys. Use bigger keys if more security is needed. The advantage of smaller keys is the encryption processing is lighter, so it they can be useful for less powerful systems, or those serving a lot of users.
Switch to the extension tabs. The TLS Server template selects the “End Entity” type, and sets the validity to 365 days. Certificates issued by public Internet CAs have a maximum validity of 397 days – 13 months, in this example I set the same lifetime. The additional month helps to renew the certificate in time without the end date day/month changing. Remember to press the “Apply” button.
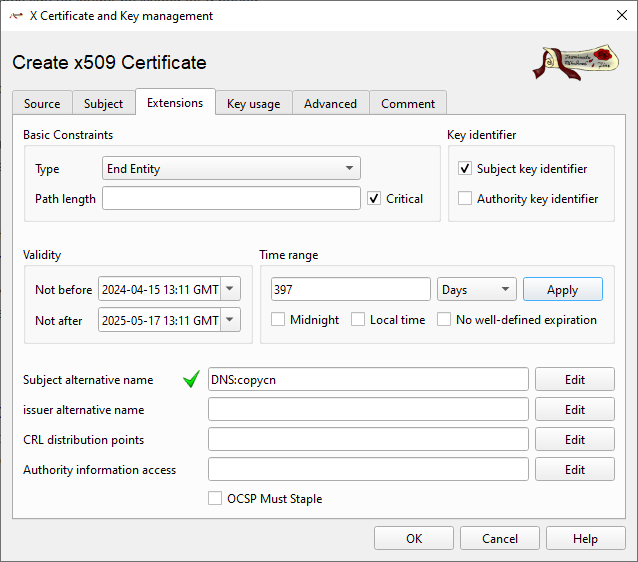
XCA will check the certificate start/end date falls within the CA validity range, and will ask you what to do if they do not. When you generate certificates from your own private CA, you can make them last more than 397 days, and browser and other application will accept them. XCA can generate vCalendar files from certificates you can import in your calendar application to be notified when certificates expire.
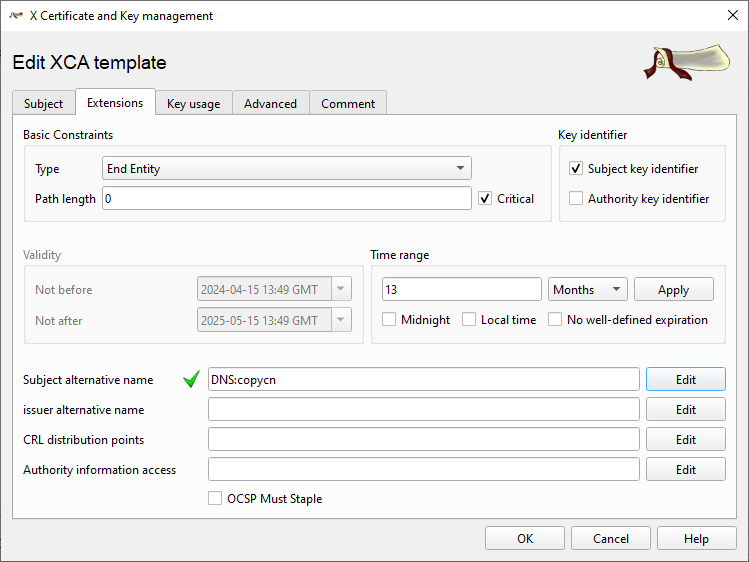
The Subject Alternative Name is another important mandatory field. Unlike the common name, it can contain more than one name, and in different formats. It can contain IPs too:
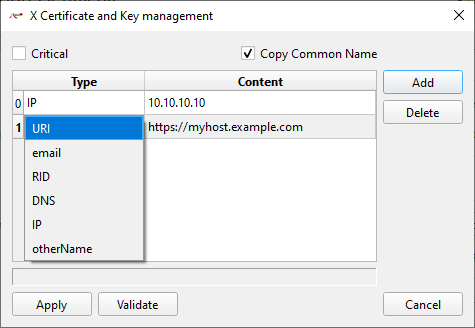
XCA by default inserts a special placeholder that automatically copies the value found in Common Name. You can disable it unchecking “Copy Common Name”. You can add names in the grid: press “Add”, select the format (for a host certificate only URI, DNS and IP are useful) and then set the value in the Content field, in the proper format.
Alternative names can be quite different from each other. Nothing forbids to have www.example.com, www.example.org, www.anotherdomain.com, myhost.example.local, or any other combination in the same certificate. You can also create “star” certificate using *, i.e. *.example.com, which will validate any host in the example.com domain (beware sharing the private key, though – mostly useful for proxies or the like).
You can also insert IP addresses so the certificate will work even if you type an IP address to reach the server instead of an host name. Be careful for IP you don’t own, especially public, ISP assigned ones. You could valide a host that is no longer yours. Public CAs won’t issue certificate with IPs you can’t prove to own, or for RFC 1918/ULAs IPs (private subnets).
Switch to the Key usage tab. Again, the template should have set the right usages already:
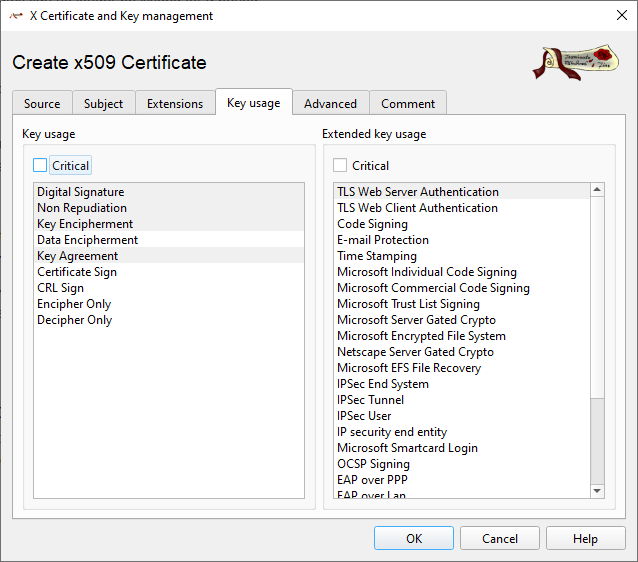
Digital signature/Non repudiation/Key Encipherment and Key Agreement are the required ones. Note that Data Encipherment is not selected. Usually TLS certificates are not used for data encryption – just to authenticate the host, and exchange the symmetric key actually used to encrypt data – because that kind of encryption is faster and lighter.
The Extended key usage TLS Web Server Authentication is not mandatory but useful for web server certificates. Again the Advanced type is outside the scope of this article, and any comment can be added in the comment tab. Press OK and XCA will generate and store the certificate:
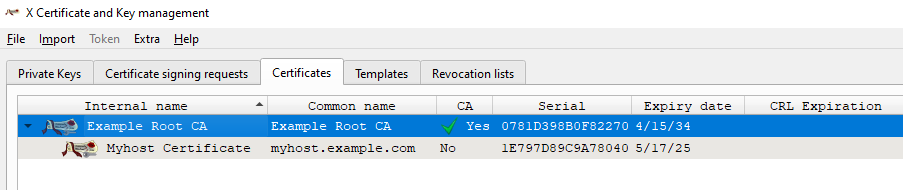
And will display it in a hierarchical view under the CA that generated it.
Export certificates
Now that we have generated certificates inside XCA, we need to export them to be able to use them in our applications. Select the certificate you wish to export, and press the Export button. If you select Export from the right click menu, you also get additional options, like copying directly to the clipboard, or export the OpenSSL configuration.
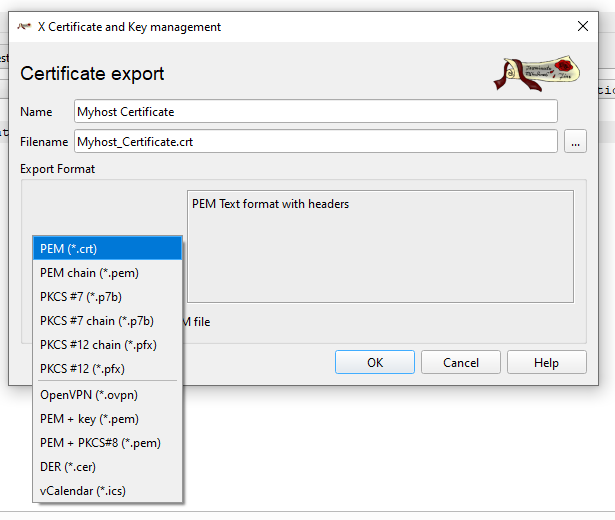
XCA allows to select different export formats, and can generate certificate chains automatically. Select the format you need, the name that should appear in the exported certificate, and the file destination. Windows often uses certificates in the DER binary format, but will accept also certificate in the Base64 encoding used by the PEM format, commonly used in *nix and other systems. PKCS #12 format can also export the private key, in an encrypted container. XCA will ask for the password to assign.
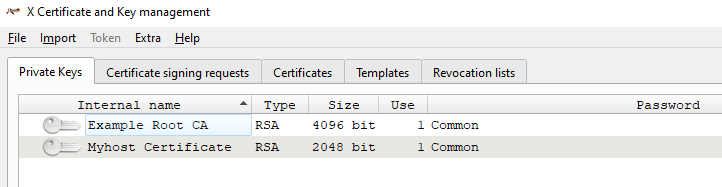
XCA can also export the key separately. First, go to the Key tab and select the key you wish to export:
Select the key you need to export and press Export, or select Export from the right-click menu. A dialog similar to that used to export certificates is shown, but of course the export formats are those for private keys:
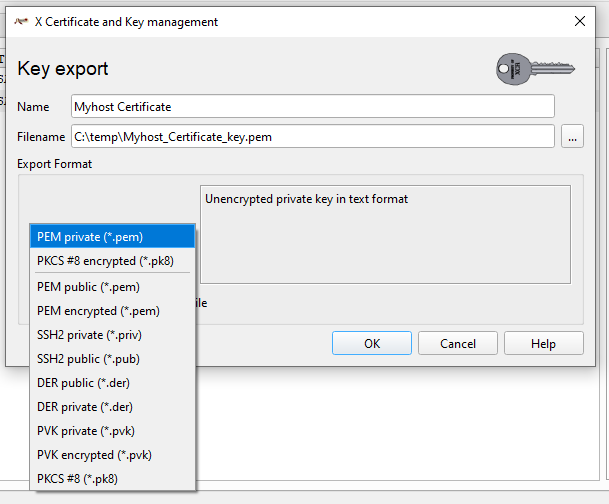
Press OK to export the key into the desired file. These are very sensitive files, especially when not encrypted. Don’t leave them around. While you will need to export a host certificate private key because server applications will need it to work, exporting the CA private key is not needed, unless the whole CA has to be moved into another certificate manager. Remember that when a CA is compromised, all the certificates it signed are too.
Now that you have exported the CA and host certificate you will need to import the CA in the devices/applications that need to verify your host certificate (i.e. your OS or web browser), and set the servers that need to encrypt their traffic to use the host certificate/key pair.
Certificate revocation lists
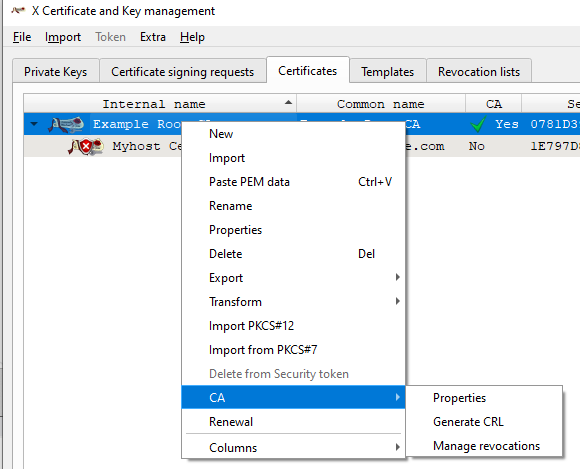
Certificate becomes invalid when they expire (or are not yet valid). A client can easily check if the certificate is expired because those dates are in the certificate itself. But you may need to invalidate a certificate at any time, for several reason – then a way to let clients know it is needed. One of this is a Certificate Revocation List (CRL), published at the address listed in a CA. The other is using the OCSP protocol, but this requires a specific server and XCA is not an online system. Before publishing a CRL, we need to generate it. And to generate it with something inside we need to revoke a certificate first. So, select a certificate and then Revoke from the right-click menu:
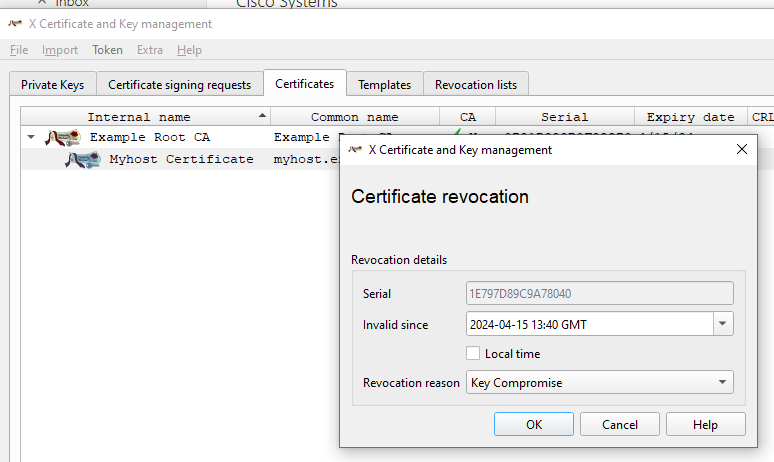
XCA shows the revoke certification dialog. You can set the time the certificate becomes invalid (useful, for example, if you are going to retire a server), and the revocation reason – in this example the key was compromised. Press OK and now the certificate appears with the “revoked” icon in the list. Now select the CA and select CA > Generate CRL from the right-click menu:
The Generate CRL dialog opens. A CRL has a validity too – they contains the last date they was updated, and when the next update will be published. After that date, they may be considered “stale”.
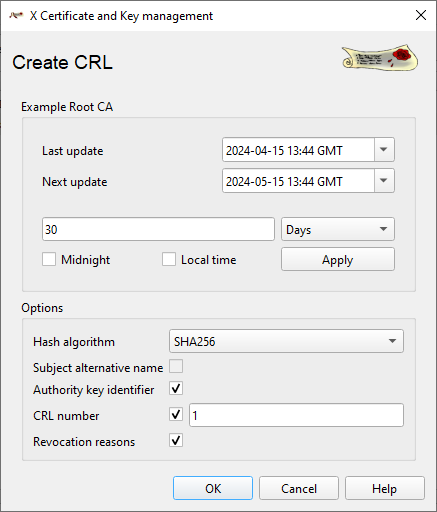
Each CRL has a CRL number which is incremented at each generation, and may contain or not the certificate revocation reasons. Press OK and a new CRL will be generate in the Revocation Lists tab. Switch to it:

CRLs can be exported just like certificates. If you make them available for download at the address specified in the CA CRL distribution points, a client can check automatically if the certificate is still valid or not.
Templates
When you have to generate several certificates, re-entering each time common settings is tedious. XCA lets you turn a certificate into a template for new certificates, so you can change only some settings.
Select a certificate and from the right-click menu select Transform > Template. A new certificate is opened, but this time this a template. Not all fields are now active – some don’t make sense in a template, for example a template has not a Private key, since a different one has to be generated for each certificate created from the template.

The values you set here will be copied to the certificate generated from the template – but the Internal name, this is the template name inside the XCA database. Any value can still be changed in the new certificate.
The Extensions tab too has some settings disabled, like the validity range, again, it will be set when creating a certificate from the template:
But you can set the other values as needed. That apples to the Key usage tab, Advanced and Comment tabs as well. When you press OK, the template is saved in the database, and appears in the Templates tab. And when you create a new certificate, you can select if rom the Template for the new certificate drop down:
You can also select a template and then Create certificate from the right-click menu.
This is everything needed to generate a working CA and host certificates. Next time we will see how to renew expiring certificates, and how to generate other kind of certificates.